Emacs Keyboard Shortcuts for Microsoft Word
Mac and iPad users get used to using standard keyboard shortcuts, like Control-A to move the cursor to the start of the line or Control-E to move to the end of the line, when editing text files. While these shortcuts don’t work by default in the Mac version of Microsoft Word, it’s easy to add them and preserve this functionality. These shortcuts should be familiar to users of the Emacs text editor and development platform where they were first introduced. Microsoft Word doesn’t support these by default, but you can add them through keyboard customization. Here are the ones I find most useful:
- StartOfLine: Control-A
- EndOfLine: Control-E
- LineUp: Control-P
- LineDown: Control-N
- CharLeft: Control-B
- CharRight: Control-F
Create New Keyboard Shortcuts in Microsoft Word
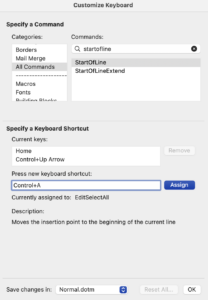
To set up these shortcuts in Word, go to Tools> Customize Keyboard. From the Categories panel, choose All Commands. Find each of the entries in the above list, select the Press new shortcut box for each, then type the shortcut as shown above and click Assign. For example, to add a new shortcut to StartOfLine, press the Control and the “a” keys at the same time; Control-A should appear in the text box and the Assign button should enable.
Microsoft Word will tell you if any of the shortcuts are currently assigned to other commands. While setting the keyboard shortcuts per the above will override the print function normally called by Control-P, make bold by Control-B, and find by Control-F, Command-P, Command-B, and Command-F will function identically and in a more familiar way for Mac users.
Once you enter these shortcuts, make sure the changes are saved to Normal.dotm and click OK.
Implement Kill-Line in Microsoft Word
The icing on the cake is implementing an Emacs feature called kill-line, which deletes text from your cursor location to the end of the line using the Control-K shortcut (this also works in most Mac and iPad apps).
To get kill-line working, you’ll need to create a macro in Word. Go to Tools> Macro> Macros. Set the Macros in: drop down to Normal.dotm and macro name to KillLine, then click Create. After the Visual Basic editor launches, replace the new macro text with the following:
Sub KillLine()
'
' KillLine Macro
'
'
Selection.EndKey Unit:=wdLine, Extend:=wdExtend
Selection.Cut
End Sub
Click the diskette icon in to save your changes and return to Word. Click Tools> Customize Keyboard, choose Macros from the Categories pane, and assign your new macro to Control-K. Once you’ve completed that customization, you can use Control-K to delete text from your cursor location to the end of the current line.

